Remove object from image: A Practical AI Workflow for Content Marketers
Clean up product, travel, and lifestyle photos—upload, mask with brush or lasso, sanity-check details, and export. No Photoshop required.
 Emily CremerDecember 4, 2025
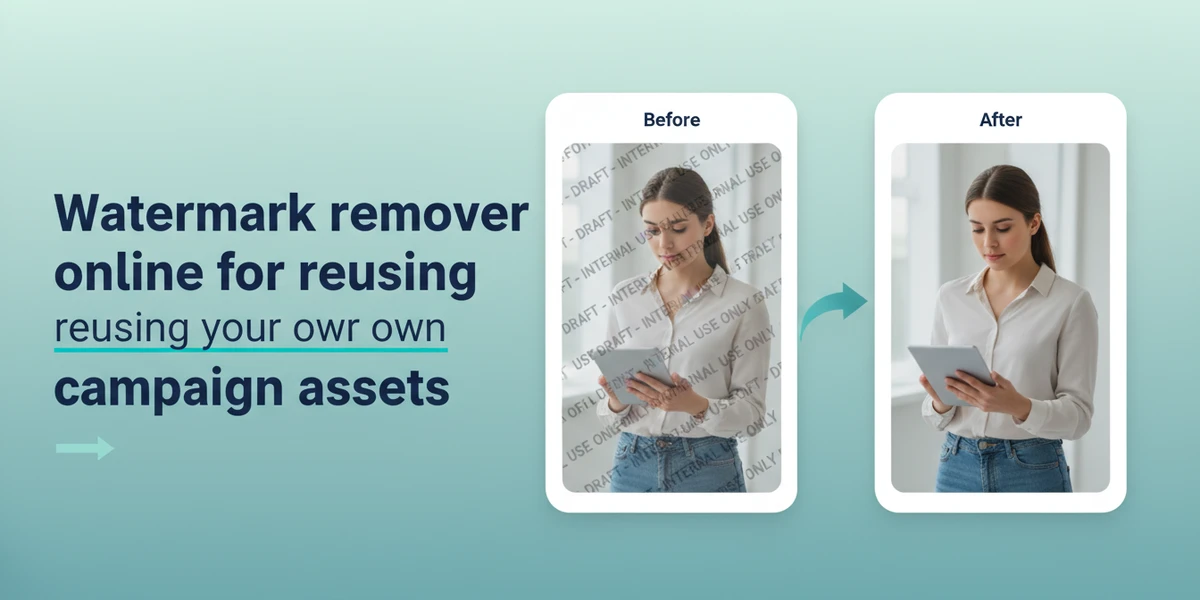
Remove Object from Image: A Practical AI Workflow for Content Marketers
You’ve lined up a product launch or a social post, but the best image you have includes a dangling price tag, a passerby in the background, or a distracting cable. You could wait for a designer, open a complex editor, or post anyway—and hope no one notices. In 2025, content teams don’t need that bottleneck. With no‑code AI, you can remove objects quickly, keep campaigns moving, and meet stricter creative guidelines across marketplaces and social platforms.
If you’re ready to streamline your workflow, an online AI tool can help you seamlessly remove object from image without switching to pro desktop software. Try a focused workflow that lets you brush over distractions and fill the background intelligently—start with this simple way to remove object from image.
(See image: Before-and-after product photo where a price tag and hanger are removed using an object remover.)
When to remove—and when not to
Object removal is a practical fix for:
- Product listings: hangers, price tags, dust, scuffs, or unwanted props.
- Lifestyle and travel content: stray people, trash bins, signage, or power lines.
- Social media: reflections of the photographer or studio gear; mismatched brand elements.
Avoid object removal when it compromises context or trust:
- Journalistic or regulated content where edits must be disclosed or avoided.
- User-generated content where removal changes the meaning of the scene.
- Brand logos and watermarks you do not own—removal can violate rights and platform rules.
Tip: If you edit for clarity (not deception) and keep a clean backup, you can revert or disclose edits as needed.
How AI object removal works (in plain English)
Modern online tools use generative inpainting—a context-aware fill that analyzes surrounding pixels to synthesize plausible content where the object used to be. You select the unwanted item (with a brush or lasso), and the tool: 1) Detects edges and texture flow, 2) Samples nearby colors, patterns, and lighting, 3) Generates pixels to replace the masked area so it blends into the scene.
On busy textures (brick, water ripples, hair), good tools preserve directionality and lighting gradients. On clean surfaces (sky, wall, tabletop), fills should be seamless with no repeating artifacts.
Online AI object remover vs. desktop editors and outsourcing
- Time-to-result
- Online AI: seconds to minutes in your browser.
- Desktop (e.g., pro editors): powerful but slower without expert shortcuts.
- Outsourcing: hours to days with back-and-forth revisions.
- Learning curve
- Online AI: brush, lasso, apply—minimal training.
- Desktop: mastery of layers, masks, and multiple tools.
- Outsourcing: no learning, but requires briefs and QA cycles.
- Cost and scalability
- Online AI: pay for use; predictable for teams with variable volume.
- Desktop: license plus training time.
- Outsourcing: per-asset fees add up, less flexible for urgent edits.
- Control and iteration
- Online AI: instant preview and quick retries.
- Desktop: full control if you’re an expert; slower otherwise.
- Outsourcing: limited control between revision rounds.
- Batch processing
- Online AI: many tools now process sets of images consistently.
- Desktop: scripts/actions work—but require setup time.
- Outsourcing: batch capacity depends on vendor and SLA.
Asset prep checklist (five minutes that prevent rework)
- Resolution: Start with the highest available resolution. More pixels = better inpainting.
- File formats: Work from lossless or high-quality sources (PNG, TIFF, high‑quality JPG).
- Backups: Always keep an untouched original; do nondestructive edits.
- Composition: If possible, crop after removal so the fill has more context to sample.
- Lighting: Note shadows and reflections you’ll need to preserve for realism.
Step-by-step: remove object from image in your browser (no pro software required)
Use this tool-agnostic flow for most online removers:
1) Import your image
- Drag and drop or use the upload button. Use the largest original you have.
2) Select the object to remove
- Start with a round brush for organic shapes; use a lasso for precise edges.
- Slightly extend your selection beyond the object to capture edge pixels.
3) Apply removal (inpaint/fill)
- Run the AI fill. If you see smudges or repeats, undo and refine the mask.
4) Refine edges
- Feather the selection by 1–3 px to blend. Re-run fill on stubborn edges.
5) Check lighting and texture
- Compare grain/noise, direction of lines, and highlight intensity.
6) Export a test version
- Save a copy and zoom to 100–200% to spot halos or mismatched patterns.
7) Finalize
- If the result holds up at channel size (e.g., Instagram post, Amazon thumbnail), export the final.
(See image: Travel scene with a passerby removed; zoomed crops highlight edge cleanup and texture continuity.)
Pixflux.AI walkthrough: upload → AI process → download
Pixflux.AI is a straightforward way to get clean results fast, especially if you want to handle product, travel, or lifestyle photos without a heavy editor. Here’s the five-step flow:
1) Open the Pixflux.AI tool page
- Head to the online editor to get started with an AI object remover online.
2) Upload your image
- Drag-and-drop or click to upload. Use the highest-resolution file you have.
3) Choose the Object Removal tool and run the AI
- Use the brush or lasso to mark the object. Keep the selection slightly wider than the object’s edge for cleaner fills. Click to process.
4) Preview and fine-tune
- If you notice minor artifacts, adjust the selection, feather edges, or run the fill again for an improved blend.
5) Download the result
- Export in JPG or PNG based on your channel needs. Keep a backup of both original and edited versions for future tweaks.
(See image: Pixflux.AI interface showing the three-step flow: upload image, AI process, and download result.)
Precision selection: brush vs. lasso, feathering, and iteration
- Brush for organic shapes: People, cables, stains, or props with soft edges. Use a medium hardness brush and overlap the background by a few pixels.
- Lasso for straight edges: Signs, boxes, frames. Trace slightly outside the object to avoid leaving a hard outline.
- Feathering: 1–3 px is enough for most photos. Increase feathering for high-contrast edges to avoid halos.
- Iterate rather than overshoot: Remove large items first, then clean up micro artifacts with small, localized fills.
Pro tip: On repeating textures (brick, tiles, fabric), run smaller, directional selections that follow the pattern’s lines. This helps the fill continue the pattern naturally.
Quality checks: shadows, reflections, textures, and perspective
Use this quick QA routine before exporting:
- Shadows: If you removed an object that cast a shadow, ensure the shadow disappears consistently on the ground or surface.
- Reflections: Check mirrors, windows, and glossy products for ghost reflections of the removed item.
- Texture continuity: Look for seams in wood grain, brick, or fabric. Re-run small selections along broken lines.
- Perspective: Lines should remain straight; converging lines should match the scene’s vanishing point.
- Noise and sharpness: If the fill looks softer or cleaner than the surrounding area, apply light noise/grain or run an AI enhancement to match sharpness and contrast.
Export for channels: JPG vs. PNG, sizes, color profiles, compression
- JPG: Great for photos on web and social. Use 80–90% quality for a good size-to-quality balance.
- PNG: Best for images with transparency or flat graphics. Larger file sizes are normal.
- Color profile: Export sRGB for web to ensure cross-device consistency.
- Sizes: Match platform specs (e.g., 1080×1350 for portrait social posts, 2000–3000 px wide for product pages). Generate multiple sizes for speed and consistency.
- Compression: Preview at target size. If artifacts appear, increase quality or use a smarter compressor.
Batch cleanups for product galleries with Pixflux.AI
Refreshing a catalog or campaign? Batch processing saves hours:
- Upload multiple images to remove consistent distractions (tags, hangers, background mess) across a set.
- Apply similar removal selections where patterns repeat—use smaller, repeatable masks per item for predictable fills.
- Combine with other quick fixes: Pixflux.AI can also clean backgrounds, remove watermarks you own the rights to, enhance clarity, and erase extraneous objects across batches. Keep a versioned folder structure so teams can review, approve, and swap assets as needed.
Note: Always work within your rights. Only process images your team owns or is licensed to edit.
Ethics and rights: where to draw the line
- Rights and ownership: Only remove objects or watermarks from images you own or have explicit permission to edit. Do not use removal tools to infringe on copyrights or bypass platform rules.
- Transparency: For editorial or sensitive contexts, disclose significant edits when they affect interpretation.
- Brand integrity: Removing logos you do not own can violate contracts and marketplace policies.
Troubleshooting common issues
- Halos around edges
- Cause: Hard-edge selection or insufficient feathering.
- Fix: Feather 2–3 px, expand the selection slightly, and re-run the fill.
- Repeating patterns that look fake
- Cause: Large, single-pass selection on textured surfaces.
- Fix: Use smaller, directional passes that follow the pattern’s flow. Introduce slight variations.
- Low-detail or blown-out backgrounds
- Cause: Overexposure or compression.
- Fix: After removal, add subtle noise or grain to match the surrounding texture; adjust exposure/contrast.
- Perspective mismatch
- Cause: Fill ignores vanishing lines.
- Fix: Redo the selection in smaller segments aligned to perspective lines; check horizontal/vertical consistency.
- Edge discoloration
- Cause: Color bleed from the original object.
- Fix: After inpainting, lightly brush correct color or reselect with more coverage beyond the object’s edge.
Why this matters now
- In 2025, no-code AI tools are robust enough for routine cleanup—generative inpainting quality rivals desktop workflows for everyday marketing assets.
- Platforms and marketplaces are stricter about visual clutter and brand consistency. Clean, distraction-free images can improve click-through and conversion, and speed up listing approvals.
- Batch processing is now table stakes for content teams, enabling faster campaign refreshes and evergreen asset maintenance.
AI online tools vs. traditional methods: a quick recap
- Speed: Browser-based AI delivers near-instant results; great for tight deadlines.
- Skills: Minimal learning curve versus advanced retouching skills in pro software.
- Scale: Easy to process dozens of images for a collection or campaign.
- Collaboration: Share edits and results quickly across teams without passing around heavy files or plugins.
Pixflux.AI fits this modern workflow: quick selection tools, strong inpainting, and the ability to handle multiple images when you’re cleaning product galleries or social sets.
Conclusion and next steps
Clean visuals are now a marketing standard, not a “nice to have.” With a focused, browser-based workflow, you can remove distractions in minutes, keep campaigns on schedule, and maintain channel quality without opening a complex editor or waiting on outsourcing.
Ready to see it in action? Try Pixflux.AI and effortlessly remove objects from photos for your next product page, travel story, or lifestyle post. Keep a backup of your originals, follow the quick QA checklist, and ship confidently.


