Remove object from image: A Practical AI Workflow for Social Media Creators
Tired of clutter in your shots? Use an online AI editor to brush or lasso distractions away, check edges at 200%, and export crisp posts—no Photoshop needed.
 Emily CremerDecember 4, 2025
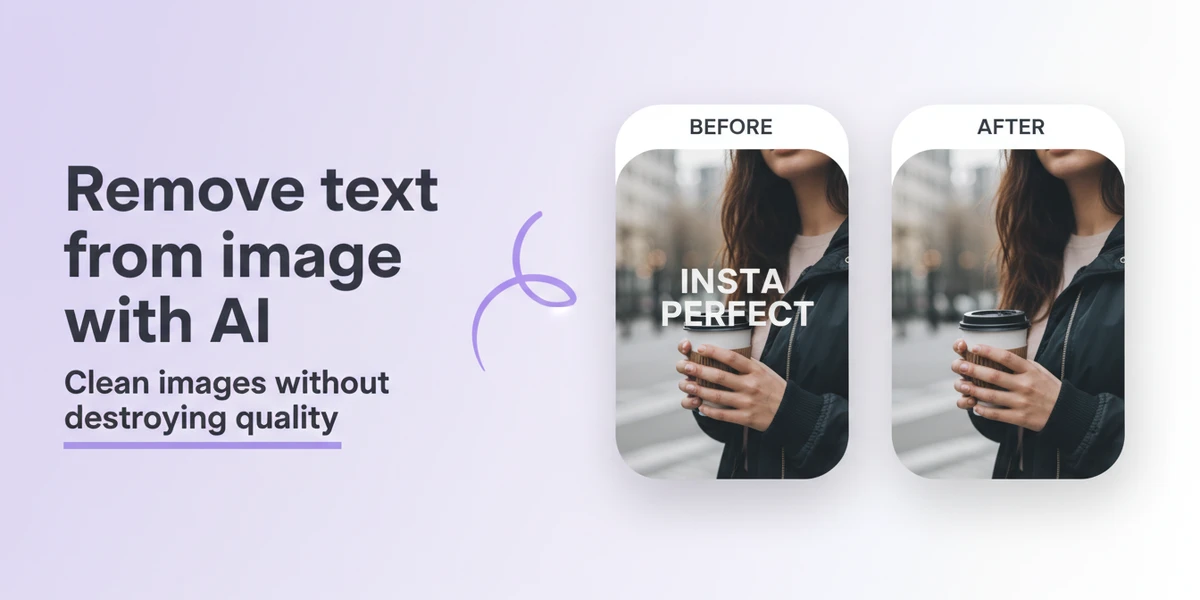
Remove Object from Image: A Practical AI Workflow for Social Media Creators
You nailed the shot—but a passerby wandered into frame, a power line cuts the sky, or a stray logo sneaks onto your product. Cleaning these distractions by hand slows down your posting cadence, and on fast-moving platforms that’s costly. In 2025, platforms reward clean thumbnails with higher click-through rates, and brand safety/privacy expectations are only rising. Instead of spending an hour cloning and healing, an AI editor can help you quickly remove object from image and keep your content pipeline moving.
This guide shows social media creators, marketers, and solo founders how to use an online AI tool—Pixflux.AI—to remove people, wires, trash, logos, or unwanted reflections in a few guided steps. No Photoshop skills required. You’ll learn the essentials (selection masks, inpainting, edge blending), a fast workflow, quality checks at 200% zoom, and export settings for Instagram, TikTok, and YouTube.
(See image suggestion: Before-and-after comparison removing a passerby from a beach photo using Pixflux.AI brush selection.)
Why fast object removal matters for scroll-stopping posts
- Product content: Clean hero images without price tags, shelf clutter, or neighboring items to keep buyers focused on what matters.
- Travel and lifestyle: Remove bystanders for privacy, erase trash bins, cones, or signage that distract from the scene, and keep the story on you.
- Thumbnails and covers: Clear, legible visuals test better in A/B experiments. Removing small distractions boosts clarity and clicks.
Short-form creators now prioritize mobile-friendly, fast editing workflows. When speed is everything, an AI object remover that works in the browser lets you fix photos in minutes between shoots, without waiting for a desktop session or outside help.
The core ideas: selection masks, inpainting, and edge blending
Understanding a few simple concepts makes you faster and more precise:
- Selection mask: You mark the area you want to remove using a brush or lasso. The tighter and cleaner your mask, the better the fill.
- Inpainting: The AI fills the selected area by predicting what should be behind it, based on surrounding pixels (textures, colors, patterns).
- Edge blending: The transition between inpainted pixels and the original image. Good blending avoids “cutout” edges or halos.
In 2025, diffusion-based inpainting models deliver more natural fills and better edge blending, especially around fine details like hair against the sky or textured surfaces such as sand, grass, or fabric.
(See image suggestion: Close-up crop showing clean edge blending around hair and sky after object removal.)
Online vs traditional tools: where an AI object remover fits
Traditional methods (clone stamp, healing brush, content-aware fill) can be precise—but they take time and experience.
- Time cost: Manual retouching can take 15–30 minutes per image; AI fill often takes under a minute for simple removals.
- Learning curve: Retouching tools demand practice; online AI keeps it point-and-click with sensible defaults.
- Batch speed: Creators who publish daily can process multiple photos in a sitting; manual work doesn’t scale.
- Team-friendly: A browser-based tool is easy to share across teams or contractors without software installs or licensing complexities.
You can still fine-tune in desktop software when needed. But for most social content, an online AI pass gets you 90% of the way there—fast.
Step-by-step: remove object from image with Pixflux.AI
Below is a three-step workflow using Pixflux.AI that fits a typical creator’s day. It covers upload, selection, quality checks, and export.
1) Upload your image
- Open the AI object remover online.
- Drag-and-drop your photo or tap to upload. Higher-resolution images (e.g., 3000px+ on the long side) typically produce cleaner fills.
2) Select and remove
- Choose Brush or Lasso. Brush is great for organic shapes (people, hair), Lasso for structured elements (signs, wires).
- Paint over the object you want gone. Slightly overlap edges so the AI has context for blending.
- Click Remove. The inpainting engine fills the selection using nearby textures, lines, and color cues.
- Tip: For thin objects (wires/strings), zoom in and use a smaller brush; for larger areas (cars, bystanders), mask in chunks if needed.
3) Review and download
- Zoom in to 200% and scan edges, textures, shadows, and reflections. If anything looks off, undo and refine your mask or run a second pass.
- Once satisfied, download the processed image as JPG or PNG based on your platform needs.
(See image suggestion: Three-step sequence of the Pixflux.AI interface: upload image, AI processing preview, and download result.)
Advanced controls that speed up accurate selections
- Feather the selection slightly if you’re removing objects against soft backgrounds like sky or water to prevent hard edges.
- Use multiple small passes for complex scenes. Remove foreground clutter first, then secondary elements.
- If the background is too busy to inpaint cleanly, consider switching tactics: use background removal, generate a clean brand-colored backdrop, or replace with a subtle studio scene. Pixflux.AI supports all of these approaches when a simple inpaint isn’t enough.
Quality checks before export: edges, textures, shadows, reflections
Spend 30 seconds inspecting your result—this is where quality jumps from “fine” to “flawless.”
- Zoom to 200%: Check the boundary where the object was. Edges should blend naturally with no halos or hard seams.
- Texture continuity: Wood grain, bricks, sand, clouds, or fabric patterns should look consistent, not stretched or smeared.
- Shadows and reflections: If you removed an object that had a shadow or reflection, ensure the remaining light looks realistic. You may need a second pass to soften residual shadows.
- Color harmony: Make sure filled areas match the surrounding hue and saturation. If the fill looks cooler/warmer, a quick global color tweak can help.
- Pattern repetition: Watch for repeating tiles in patterned backgrounds. If you see duplicates, run another remove with a slightly larger or differently shaped mask.
Export settings for social platforms
Pick the right format and dimensions for your destination:
- Instagram feed and Reels covers
- Portrait: 1080 × 1350 px (4:5) or 1080 × 1920 px if repurposed as a Reel cover.
- File type: JPG at 80–90% quality for a balance of sharpness and size. PNG if you need crisp text overlays.
- TikTok
- Vertical: 1080 × 1920 px.
- Keep file sizes efficient to avoid compression; stick with sRGB color space for consistency across devices.
- YouTube thumbnails
- 1280 × 720 px (minimum), 16:9 aspect.
- PNG is often best for type-heavy thumbnails; JPG works well for photographic scenes.
- Archiving and future edits
- Keep a high-res master (e.g., 3000–4000 px on the long side) before platform-specific exports.
- Consider a lossless PNG master if you plan multiple rounds of editing or text overlays.
Batch cleanups without Photoshop
When you’re prepping a carousel, a product drop, or a travel recap, you might have 10–50 images with similar issues—bystanders in the background, stray signs, or unwanted logos. Pixflux.AI supports batch workflows: upload multiple files, run removals sequentially, and keep your brand visuals consistent. Combine object removal with optional background cleaning or image enhancement to keep an entire set on-style in one session. Always spot-check a few outputs at 200% to catch edge or pattern artifacts before scheduling posts.
Troubleshooting: halos, smudges, repeating patterns, color shifts
- Halo or hard edge after removal
- Cause: Selection was too tight or not enough overlap with the background.
- Fix: Expand the mask 3–5 px, enable slight feathering, and rerun. Blend improves with a richer context window.
- Smudged or blurry fill
- Cause: Large area inpainted at once with complex textures.
- Fix: Remove in smaller sections. Use adjacent texture cues (e.g., sample from a nearby clean patch by masking in logical chunks).
- Repeating tiles in brick or fabric
- Cause: Model latched onto a local pattern and tiled it.
- Fix: Change mask shape and size; include more varied context; run a second pass.
- Color banding or shifts
- Cause: Highly compressed source or aggressive JPG artifacts.
- Fix: Upload a higher-quality version if possible. After removal, apply a mild color correction or noise grain to even transitions.
- Fine lines (wires, fishing line)
- Tip: Use a 1–3 px brush at 200% zoom and remove in segments following the line’s curvature.
Ethics and rights: handle watermarks and sponsorships responsibly
AI can remove logos, text, and watermarks, but legal and platform rules still apply. Only edit images you own or have permission to modify. Watermark removal should never be used to infringe copyrights or bypass licensing. For sponsored content, follow disclosure guidelines in your region and platform. When people appear in your background, remove bystanders as needed to protect privacy and brand safety.
AI online tool vs traditional software or outsourcing
- Speed
- AI online: Seconds to minutes for typical removals; near-instant previews.
- Traditional/outsourcing: Minutes to hours per image; delays from task handoff and revisions.
- Learning curve
- AI online: Brush, lasso, remove—done. No steep training.
- Traditional: Mastering clone/heal/content-aware and layer workflows takes time.
- Consistency at scale
- AI online: Batch-friendly; uniform look across a set with the same touch.
- Traditional: Human variability and fatigue can introduce inconsistencies.
- Flexibility
- AI online: Works on any device with a browser; ideal for creators on the move.
- Traditional: Tethered to specific machines and licenses.
For complex composites, traditional software still shines. But for day-to-day creator needs—cleaning a product hero, removing a passerby, or erasing a sign—an online AI object remover like Pixflux.AI is faster and more than good enough.
Bonus: When to switch to background edits or enhancement
Sometimes removal alone isn’t the best route:
- Background too chaotic to repair? Replace it with a minimal on-brand color or generated studio scene.
- Subject underexposed after removal? Use AI enhancement to lift shadows, sharpen details, and match contrast.
- Need a cohesive campaign look? Apply similar backgrounds across a batch to unify your grid or catalog.
Pixflux.AI offers background removal and replacement, generative backdrops, and image enhancement—handy when inpainting meets its limits.
Quick checklist before you hit publish
- Did you review edges at 200%? No halos or seams.
- Do textures and patterns look natural? No obvious repeats.
- Are shadows and reflections realistic after removal?
- Are colors consistent with your brand look?
- Exported in the right format and size for your target platform?
Wrap-up: Clean posts, faster workflow
Removing distractions keeps attention on your story—and attention drives clicks, watch time, and sales. With Pixflux.AI, creators can clean up product, travel, and lifestyle images in minutes using intuitive brush or lasso selections, modern inpainting, and reliable edge blending. If you’re ready to streamline your editing routine, try it now and remove objects from photos before your next upload.
(See image suggestion: Before-and-after sequence plus the three-step Pixflux.AI interface screenshots for a quick visual walkthrough.)


